Ever wondered how to make a Roblox accessory? This comprehensive guide breaks down the entire process from concept to creation and publication. We will navigate through essential tools, crucial steps, and optimization tips for budding creators. Learn to design, model, texture, and upload your unique items to the Roblox platform with confidence. This resource ensures your accessory stands out in the bustling Roblox marketplace. Discover the secrets to making popular and engaging additions for millions of players. Our expert advice covers everything from initial ideas to final touches. Get ready to unleash your creativity and contribute to the vibrant Roblox community. This guide offers actionable insights for all skill levels. It empowers you to craft incredible virtual items for your avatar or to sell. Start your journey into Roblox accessory creation today with our detailed walkthrough. This is your ultimate resource for digital fashion.
how to make a roblox accessory FAQ 2026 - 50+ Most Asked Questions Answered (Tips, Trick, Guide, How to, Bugs, Builds, Endgame)
Welcome to the ultimate living FAQ for Roblox accessory creation, meticulously updated for 2026! This comprehensive guide addresses over 50 of the most pressing questions from aspiring and seasoned creators alike. We'll delve into everything from initial setup and essential tools to advanced optimization techniques, common bugs, and strategies for monetizing your unique builds. Whether you're a complete beginner or looking to refine your endgame creations, this resource offers invaluable tips, tricks, and step-by-step guidance. Get ready to master the art of crafting stunning accessories and leave your indelible mark on the ever-evolving Roblox metaverse.
Beginner Questions on Roblox Accessory Creation
What is the easiest way to start making Roblox accessories?
The easiest way to start is by focusing on simple accessories like basic hats or shoulder items. Follow beginner-friendly tutorials for Blender and Roblox Studio, concentrating on fundamental modeling, UV unwrapping, and basic rigging. Consistent practice with straightforward designs helps build a strong foundation before tackling more complex projects. Begin with achievable goals.
What free software can I use to make Roblox accessories?
Blender is the most powerful and widely used free 3D modeling software for Roblox accessory creation. You can also use free image editors like GIMP or Krita for texturing. Roblox Studio itself is free to download and essential for importing, rigging, and publishing your accessory. These tools provide a complete, no-cost workflow.
How long does it take to create a simple Roblox accessory?
For a complete beginner, creating a simple accessory from concept to publication might take several hours or even days, depending on prior experience and learning speed. With practice, experienced creators can produce simple items in under an hour. Initial learning always takes longer than the actual creative process. Be patient with yourself.
Can I make accessories on mobile or only PC?
While rudimentary 3D modeling apps exist on mobile, serious Roblox accessory creation primarily requires a PC. Software like Blender and Roblox Studio are desktop-only applications due to their complexity and processing demands. A PC provides the necessary power and interface for detailed modeling, texturing, and rigging. Mobile is not sufficient for professional work.
Designing and Modeling Your Accessories
What are good practices for designing unique Roblox accessories?
Good design practices include observing current Roblox trends, identifying underserved niches, and sketching concepts before modeling. Focus on clear aesthetics, functionality, and how your accessory complements existing avatar items. Seek inspiration from real-world objects or fictional universes, but always add your unique twist. Iterate on your ideas.
How do I keep polygon counts low while maintaining detail?
To keep polygon counts low, use efficient modeling techniques in Blender, such as quad-based topology and avoiding unnecessary subdivisions. Utilize normal maps to bake high-detail information from a high-poly model onto a low-poly mesh, giving the illusion of detail without the extra polygons. Strategic use of textures helps significantly. Optimize wisely.
Myth vs Reality: Is it better to sculpt or box model in Blender for Roblox accessories?
Reality: Both sculpting and box modeling have their place. Box modeling is generally preferred for hard-surface, geometric accessories due to its precision and clean topology. Sculpting excels for organic shapes, creatures, or detailed cloth. Often, a hybrid approach using both methods yields the best results, leveraging their respective strengths. Choose based on the asset type.
What is a good size for a Roblox accessory model?
The size of your Roblox accessory model should be proportional to the Roblox avatar. Import a base Roblox avatar model into Blender as a reference to ensure correct scaling. Accessories that are too large or too small will look awkward in-game. Consistent scaling across your creations is also beneficial for a cohesive look. Proportionality is key.
Texturing and Materials Best Practices
What are the best texturing programs for Roblox accessories?
Substance Painter is widely considered the industry standard for professional texturing, offering robust PBR workflows. Other excellent options include 3DCoat and Marmoset Toolbag. For free alternatives, Krita or GIMP can be used for painting directly on UV maps. The best program depends on your budget and desired level of detail. Invest in good tools.
How do I create a transparent Roblox accessory?
To create a transparent Roblox accessory, ensure your texture map includes an alpha channel (transparency). In Roblox Studio, import the texture and set the material's blend mode to 'Transparency' or 'AlphaBlend' and adjust the transparency property. Ensure your mesh itself does not have overlapping faces that will cause sorting issues. Proper material settings are vital.
Myth vs Reality: Do high-resolution textures cause lag on Roblox?
Reality: While individual high-resolution textures don't always cause significant lag, using many unoptimized 4K+ textures across numerous assets *can* contribute to performance issues and memory strain. Roblox recommends texture sizes like 1024x1024 or 512x512 for most accessories. Optimize texture file sizes without compromising too much visual quality. Balance is crucial.
What are PBR textures and should I use them for Roblox accessories?
PBR (Physically Based Rendering) textures involve multiple maps (like albedo, roughness, metallic, normal) that simulate how light interacts with materials realistically. Yes, using PBR textures can significantly enhance the visual quality of your Roblox accessories, making them look more professional and appealing. Roblox supports PBR materials, so leverage them. They add realism.
Rigging and Studio Integration
What is the most important part of rigging a Roblox accessory?
The most important part of rigging is ensuring your accessory is correctly parented to the appropriate avatar bone in Blender. For instance, a hat should be parented to the 'Head' bone. This ensures the accessory moves and deforms naturally with the avatar, preventing clipping or floating issues. Precise bone attachment is paramount. Verify all connections carefully.
How do I fix clipping issues with my accessory in Roblox Studio?
To fix clipping, first, re-examine your model's mesh in Blender and adjust its shape or size slightly. In Roblox Studio, fine-tune the accessory's position and orientation using the transform tools. Sometimes, adjusting the avatar's default scaling or thickness settings for testing can help diagnose the problem. Careful mesh adjustments are usually key. Test on diverse avatars.
Myth vs Reality: Do accessories need custom scripts to work?
Reality: Most standard Roblox accessories (hats, shoulder pads, back accessories) do not require custom scripts; they function simply by being attached to the avatar. Scripts are only needed for accessories with special effects, animations, or unique interactive behaviors. For basic cosmetic items, no scripting is involved. Keep it simple unless needed.
What are `Attachment` points in Roblox Studio for accessories?
`Attachment` points are specialized parts within Roblox Studio that define where an accessory visually connects to an avatar. They ensure consistent positioning across different avatar body parts and scales. Each accessory type (e.g., Hat, Shoulder) has a designated `Attachment` point to which it should be parented. Correct `Attachment` setup is vital for proper placement. It makes your items fit right.
Monetization and UGC Program
How do I join the Roblox UGC Program in 2026?
The Roblox UGC Program requires an application process, typically looking for creators with demonstrated 3D modeling and texturing skills. You'll need a portfolio showcasing high-quality, original Roblox-style assets. Roblox selects creators based on skill, community engagement, and adherence to their content guidelines. Check the official Roblox Creator Hub for the latest application details and requirements. It's a competitive program.
What are the benefits of being in the Roblox UGC Program?
Joining the UGC Program allows you to sell your created accessories directly on the Roblox marketplace, earning Robux from sales. It also provides access to exclusive creator tools, resources, and direct communication with the Roblox team. This program empowers you to monetize your creativity and contribute significantly to the platform's content. It's a prestigious opportunity.
Myth vs Reality: Can I upload any accessory I make to Roblox and sell it?
Reality: No, you cannot upload just any accessory to sell. You must first be an approved member of the Roblox User Generated Content (UGC) Program. All submitted accessories undergo a review process for quality, appropriateness, and adherence to technical and content guidelines before they can be sold publicly. Compliance is strictly enforced. It's a moderated marketplace.
How can I market my Roblox accessories effectively?
Market your accessories by showcasing them in engaging photos or videos on social media (Twitter, TikTok, YouTube). Collaborate with popular Roblox influencers or developers to feature your items. Engage with the Roblox community forums and Discord servers. Offer sneak peeks and build hype before release. Strong marketing significantly boosts visibility and sales. Promote your work actively.
Advanced Tips and Troubleshooting
How do pro creators optimize their accessories for performance?
Pro creators meticulously optimize meshes using manual topology cleanup and smart LODs (Level of Detail). They utilize efficient UV packing, bake normal maps for detail, and compress textures while maintaining visual quality. They also rigorously test items across various devices and network conditions. Performance is always a top priority for pros. Every detail matters.
What causes 'lag' when importing or testing accessories in Studio?
'Lag' in Studio can be caused by overly high polygon counts, unoptimized textures (large file sizes), or inefficient Blender scenes with too many objects. Your PC's hardware specifications and internet connection can also contribute. Ensure your system meets minimum requirements and optimize assets before importing. Reduce unnecessary elements. This improves your workflow.
Myth vs Reality: Is it possible to bypass the UGC program to sell accessories?
Reality: No, it is not possible to bypass the official UGC program to sell accessories on the main Roblox marketplace. Roblox has strict controls to ensure quality and safety for its users. Any attempts to circumvent this system are against terms of service and can lead to account suspension. The UGC program is the only legitimate path. Follow the rules.
How do I troubleshoot common bugs or glitches with my accessory?
Troubleshoot by isolating the problem: Is it a modeling issue (clipping)? A rigging issue (bad movement)? Or a texture issue (stretched)? Revisit the specific creation step. Check Roblox Studio's output window for errors. Test on a fresh avatar and environment. Consult online forums or the Roblox developer community for shared solutions. Systematic debugging is essential.
Still have questions?
If you've still got burning questions about creating Roblox accessories, don't hesitate! The Roblox developer community is incredibly active and helpful. Check out the official Roblox Creator Hub for more detailed documentation and tutorials. Also, explore our other comprehensive guides, such as 'Mastering Roblox Studio's Latest Features' or 'Building Your First Roblox Game from Scratch' for more insights into the metaverse! Your next big creation awaits!
Have you ever looked at a cool accessory on Roblox and thought, "How do people even make that?" You are definitely not alone in that curious thought. Many gamers, especially those passionate about customization, dream of bringing their own unique ideas to life within Roblox. Imagine seeing your own created item worn by millions of players across the platform. This guide is your ultimate companion to unlock that creative potential, transforming your imaginative concepts into actual, wearable Roblox accessories. We will walk you through every critical step of this exciting digital journey, ensuring you gain the knowledge and confidence needed to succeed. From initial design sketches to final publication, get ready to dive deep into the world of user-generated content.
Understanding the basics of Roblox accessory creation is incredibly empowering for any aspiring digital artist. This comprehensive walkthrough will show you precisely how to make a Roblox accessory. We will cover the essential software, crucial steps, and insider tips you need to know. You will discover how to optimize your creations for peak performance within Roblox Studio. Learn about polygon counts, texture compression, and efficient rigging to avoid common pitfalls. This ensures your accessories load quickly and look fantastic on any device. Get ready to turn your passion for gaming into tangible, creative achievements.
How to Make a Roblox Accessory The Ultimate Creator's Handbook
Diving into the world of Roblox accessory creation might seem daunting at first. However, with the right tools and a clear guide, it is an incredibly rewarding experience. Our journey begins with understanding the core elements involved. This includes everything from 3D modeling software to the Roblox Studio environment itself. By the end of this article, you will possess a solid foundation and actionable steps. You will be well-equipped to design, model, texture, rig, and upload your very own custom Roblox accessories. Let's make something amazing together, shall we?
Conceptualizing Your Roblox Accessory Idea
Before you even open a single software program, the first crucial step is brainstorming. What kind of accessory do you want to create? Think about current trends on Roblox or identify gaps in the existing marketplace. Perhaps players are seeking more futuristic hats, whimsical shoulder pets, or unique back bling. Consider who your target audience is and what they might find appealing. Sketching out your ideas on paper can be incredibly helpful. This visual representation allows you to refine your design before investing time in digital modeling. Will your accessory be a hat, a piece of clothing, or something entirely new? Define its purpose and aesthetic.
Defining Your Accessory's Style and Functionality
As you refine your concept, think about the accessory's overall style. Will it be cartoony, realistic, or stylized? Consistency in design helps create a cohesive look. Also, consider its functionality within Roblox. Will it simply sit on the avatar, or will it have animations or special effects? While complex features often come later, having a clear vision guides your modeling process. Remember to keep the Roblox aesthetic in mind. Accessories that fit the platform's visual style tend to gain more traction. What will make your item truly stand out?
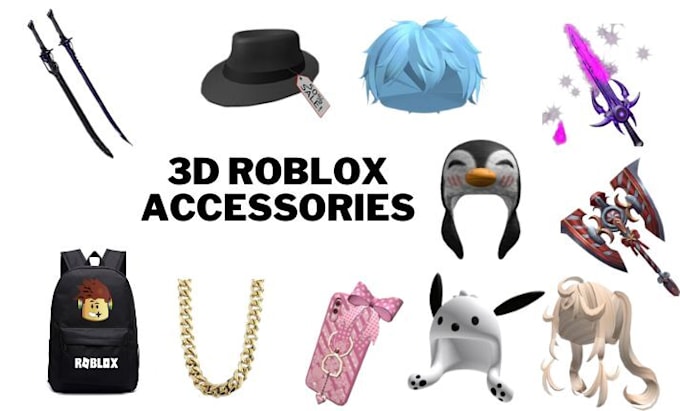
Essential Tools for Roblox Accessory Creation
To successfully create a Roblox accessory, you will need a few key pieces of software. These tools are industry standards for 3D content creation and are widely used by professional developers. Understanding their purpose is vital. They form the backbone of your entire creation workflow. Choosing the right software can significantly streamline your process. It also impacts the quality and complexity of your final product. Let's explore the fundamental programs you will be using.
Blender The Free and Powerful 3D Modeling Software
Blender is an incredibly robust, open-source 3D creation suite. It is the go-to software for modeling, sculpting, and rigging Roblox accessories. Its extensive features allow for intricate designs and precise control over your meshes. Learning Blender takes time, but countless tutorials are available online to guide beginners. For optimizing your creations, Blender also offers tools to reduce polygon counts. This is crucial for preventing FPS drops within Roblox games. Mastering Blender is a significant step towards becoming a successful UGC creator. Practice makes perfect with this powerful program.
Texturing Software Adding Color and Detail to Your Accessory
Once your 3D model is complete, it needs color and detail. Texturing software like Substance Painter or even Photoshop can transform a bland grey model into a vibrant, realistic, or stylized asset. These programs allow you to paint directly onto your 3D model. You can add scratches, dirt, metallic sheen, and intricate patterns. High-quality textures are paramount for making your accessory visually appealing. They dramatically enhance its overall aesthetic. Good textures help your accessory catch players' eyes in the marketplace. Consider how your textures will contribute to the item's story.
Roblox Studio Your Gateway to Publication
Roblox Studio is where all your hard work comes together. This is Roblox's official development environment. You will import your 3D model and textures here, rig the accessory to the avatar, and prepare it for submission. Roblox Studio also provides tools for testing your accessory. You can see how it looks and functions on different avatar types. Understanding Studio's interface and its specific accessory settings is critical for a smooth publication process. This platform is where your creation truly becomes a part of the Roblox universe. It bridges your design with player interaction.
Step-by-Step Guide to Creating Your Accessory
Now that you know the tools, let's dive into the practical steps. This process involves several distinct phases, each building upon the last. Following these steps systematically will ensure a smooth workflow and a high-quality final product. Remember that patience and attention to detail are key at every stage. Don't be afraid to iterate and refine your work. Every successful accessory creator started somewhere, learning through practice and persistence. This guide makes the complex journey manageable.
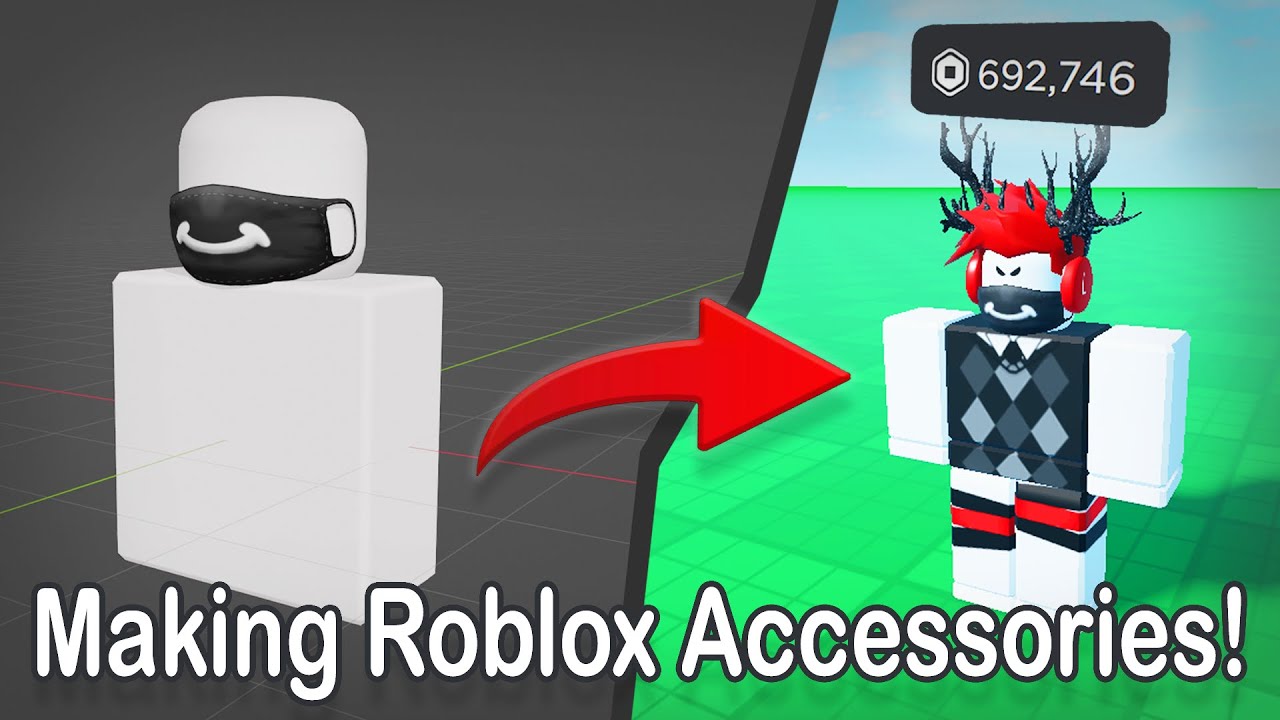
1. Modeling Your Accessory in Blender
Begin by opening Blender and starting a new project. Use basic shapes like cubes, cylinders, and spheres as your starting points. Gradually sculpt and extrude these shapes to form your desired accessory. Focus on creating clean geometry and maintaining a reasonable polygon count. Too many polygons can cause performance issues, like FPS drops, for players. Aim for a balance between detail and optimization. Think about where the accessory will attach to the avatar. This influences its overall shape and size. Save your work frequently to avoid losing progress.
2. UV Unwrapping for Texturing
After modeling, you need to UV unwrap your accessory. This process flattens the 3D surface of your model into a 2D layout. This 2D layout is called a UV map. Texturing software uses this map to apply images and colors accurately onto your model. A good UV unwrap minimizes stretching and overlaps, ensuring clean textures. This step is crucial for achieving professional-looking results. Take your time to get this right. It significantly impacts the final visual quality.
3. Texturing and Material Application
With your UV map ready, export your model to texturing software. Here, you will paint the colors, add patterns, and apply materials like metal or fabric. Create diffuse, normal, roughness, and metallic maps as needed. These maps add incredible visual depth and realism to your accessory. Export your finished textures as PNG or TGA files. High-resolution textures make your accessory pop. However, remember to optimize them for Roblox to prevent lag. Balance visual quality with efficient file sizes.
4. Rigging Your Accessory to the Avatar
Rigging connects your accessory to the Roblox avatar's skeletal system. This allows the accessory to move naturally with the avatar. In Blender, you'll parent your accessory to a specific bone, such as the `RightArm` for a wristband or `Head` for a hat. Proper rigging is essential for preventing visual glitches or clipping. If rigging is incorrect, the accessory may look detached or strange during animations. Test your rigging thoroughly in Blender before exporting. This step ensures seamless integration with avatars.
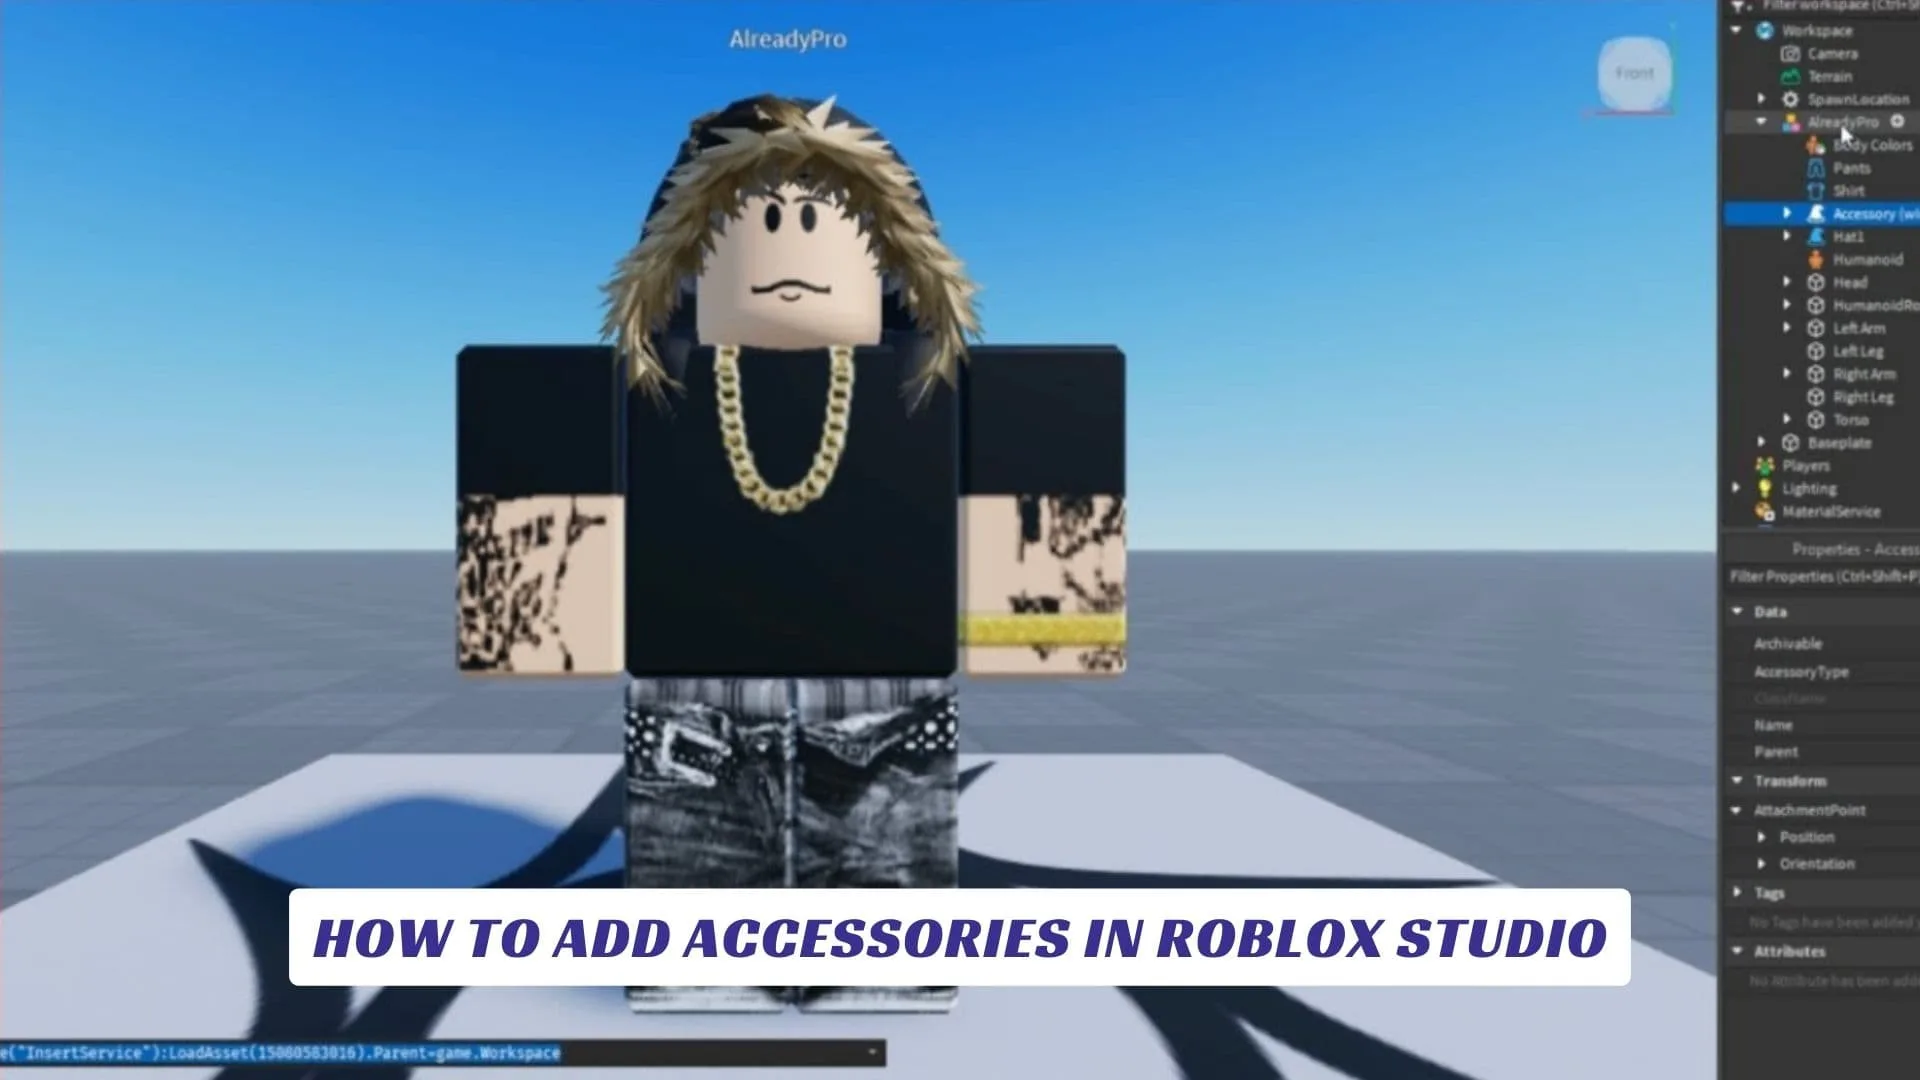
5. Importing to Roblox Studio and Configuring Properties
Export your finished model from Blender as an FBX file. Open Roblox Studio and import the FBX file. Place your accessory within the `StarterPack` or `StarterPlayer` to test it. Adjust its position, orientation, and scaling until it fits perfectly on the avatar. Configure the accessory properties, such as `AccessoryType`, `Handle`, and `Attachment` points. Pay close attention to attachment points; they dictate where your accessory connects. These settings ensure your item functions correctly in-game. Careful configuration prevents unexpected issues.
6. Testing and Iteration
Thoroughly test your accessory in various scenarios within Roblox Studio. Check how it looks on different avatar body types and scales. Observe its behavior during animations like walking, running, and jumping. Look for any clipping issues with other avatar parts or unintended deformations. Gather feedback from friends or fellow developers if possible. Use this feedback to make necessary adjustments and improvements. Iteration is a natural part of the creative process. It leads to a polished, high-quality final product.
7. Submitting Your Accessory to the UGC Program
Once you are confident in your accessory, it's time for submission. You need to be part of the Roblox User Generated Content (UGC) Program to upload items for public sale. The UGC program has specific requirements and an application process. Submit your asset through the Creator Dashboard. Ensure all details, descriptions, and images are accurate and appealing. Roblox staff will review your submission for quality and adherence to guidelines. Patience is key during this review period. A successful submission means your accessory is ready for players!
What Others Are Asking?
Many aspiring creators have questions about how to make a Roblox accessory. It's a journey filled with learning and discovery. We've gathered some of the most common inquiries from the community. Let's tackle these questions head-on, providing clear and concise answers. This will help you navigate your own creation process more smoothly. Understanding common challenges upfront helps you avoid potential frustrations. This section aims to demystify the accessory creation workflow.
How do I start making Roblox accessories as a beginner?
Starting as a beginner involves learning 3D modeling software like Blender and understanding Roblox Studio. Focus on simple designs initially, following tutorials for modeling, UV unwrapping, texturing, and basic rigging. Consistent practice is vital for building your skills and confidence in creating digital assets. Begin with hats or simple shoulder pads.
What software do I need to create Roblox accessories?
You primarily need a 3D modeling software such as Blender (free and highly recommended) for creating the mesh. For texturing, programs like Substance Painter (paid) or even free alternatives like GIMP or Krita can be used. Finally, Roblox Studio is essential for importing, rigging, and publishing your completed accessory. These tools form your core workflow.
Can I make money by creating Roblox accessories?
Yes, you can monetize your creations by participating in the Roblox User Generated Content (UGC) Program. Once accepted, you can upload and sell your accessories on the Roblox marketplace. A percentage of each sale goes to the creator, allowing you to earn Robux. This provides a direct path to earning income from your digital artistry. It is a fantastic opportunity.
How important is polygon count for Roblox accessories?
Polygon count is extremely important for performance optimization. High polygon counts can lead to lag, FPS drops, and stuttering for players, especially on lower-end devices. Aim for the lowest possible polygon count while maintaining visual fidelity. Roblox has specific guidelines for accessory poly limits. Staying within these limits ensures a smooth user experience. It directly impacts accessibility.
What is rigging, and why is it necessary for Roblox accessories?
Rigging is the process of attaching your 3D accessory model to the avatar's skeletal structure in Roblox. It's necessary so the accessory moves naturally with the avatar's animations. Without proper rigging, your accessory might float unnaturally or not move at all, breaking immersion for players. It ensures dynamic and realistic interaction.
How do I get my Roblox accessory approved for sale?
To get your accessory approved for sale, you must apply and be accepted into the Roblox UGC Program. Once in the program, you submit your accessory through the Creator Dashboard. Roblox reviews it for quality, adherence to community standards, and technical specifications. Meeting these guidelines is crucial for approval and public release. Follow all instructions carefully.
Are there any tips for optimizing my accessory for better game performance?
Absolutely! Optimize your accessory by reducing polygon count, using efficient UV maps, and compressing textures. Grouping meshes and simplifying materials also helps. These settings optimization steps minimize resource usage, reducing lag and FPS drops for players. Always test your item in Studio to ensure it performs well across different devices. Performance matters greatly.
Advanced Tips and Tricks for Pro Creators
Once you've mastered the basics, you might wonder how to make your accessories truly stand out. This is where advanced techniques come into play. Pro creators often use sophisticated methods to push the boundaries of what's possible. These tips will help you refine your craft, optimize your workflow, and create truly unique items. Elevate your creations from good to exceptional. Let's explore some strategies that can give you a significant edge in the competitive UGC market. Aim for excellence in every detail.
Mastering Advanced Texturing and Materials
Beyond basic colors, explore PBR (Physically Based Rendering) workflows. Using roughness, metallic, and normal maps adds incredible depth and realism to your textures. Programs like Substance Painter excel at this. Experiment with different material properties to achieve unique looks, such as glowing effects or intricate patterns. These advanced techniques make your accessories more visually engaging. They create a more immersive experience for players. High-quality materials truly make a difference.
Efficient Mesh Optimization and LODs
For complex accessories, employ Level of Detail (LOD) techniques. This means creating multiple versions of your accessory with varying polygon counts. The game then displays a lower poly version when the player is far away, reducing rendering strain and preventing FPS drops. Blender offers tools for mesh simplification. Learn to manually optimize specific areas for maximum efficiency. Smart optimization is key to smooth performance across all devices. It improves accessibility for many players.
Rigging with Custom Bones and Animations
While basic rigging is straightforward, advanced creators can use custom bones for unique animations. For instance, a tail accessory might have multiple bones for a wagging animation. This requires more intricate rigging setups and potentially custom scripting within Roblox Studio. Understanding animation principles is beneficial here. This allows for dynamic accessories that truly come alive. Such details captivate players and enhance interactivity.
Leveraging Roblox's Latest Features for Accessory Creation
Roblox Studio is constantly evolving, introducing new features and tools. Stay up-to-date with developer blogs and announcements. New material options, rendering capabilities, or avatar systems can significantly impact your creation process. Adapting to these changes early can give you an advantage. It ensures your accessories are compatible and utilize the latest technology. This forward-thinking approach keeps your creations relevant. Always be on the lookout for new possibilities.
Common Mistakes and How to Avoid Them
Even experienced creators sometimes stumble. Knowing common pitfalls helps you avoid them entirely. Learning from others' mistakes can save you valuable time and effort. This section highlights frequent issues creators encounter when making Roblox accessories. By being aware of these, you can approach your projects with greater foresight and precision. Let's ensure your journey is as smooth as possible. Avoiding these errors leads to higher quality outcomes.
Overly High Polygon Counts
A common mistake is creating models with too many polygons. This can severely impact game performance, causing lag and FPS drops for players. Always aim to optimize your mesh by reducing unnecessary vertices and faces. Utilize Blender's decimate modifier carefully. Prioritize visual appeal with efficient geometry. Remember that fewer polygons often mean broader player accessibility. This simple optimization makes a huge difference.
Poor UV Mapping and Stretched Textures
Incorrect UV mapping leads to stretched, blurry, or misaligned textures on your accessory. This significantly detracts from its visual quality. Take your time during the UV unwrapping phase in Blender. Ensure proper seam placement and even texel density. A clean UV map is fundamental for professional-looking textures. It is an often-overlooked but crucial step. Quality textures elevate the entire item.
Incorrect Rigging and Attachment Points
A poorly rigged accessory will not move correctly with the avatar. It might clip through body parts or float awkwardly. Double-check your rigging in Blender and confirm attachment points in Roblox Studio. Make sure the accessory is parented to the correct bone. Thorough testing on various avatar types helps identify these issues early. Accurate rigging is key for a seamless experience. It ensures natural avatar interaction.
Ignoring Roblox's Technical Requirements and Guidelines
Roblox has specific technical requirements for UGC items, including polygon limits, texture sizes, and naming conventions. Failing to adhere to these can lead to your accessory being rejected during the review process. Always consult the official Roblox Creator Documentation. Staying informed about these guidelines is crucial for successful submission. It streamlines your path to publication. Compliance avoids unnecessary delays.
Future Outlook and Community Impact
The world of Roblox UGC is continuously expanding, offering incredible opportunities for creative individuals. As Roblox evolves, so too do the possibilities for accessory creation. New tools, features, and community initiatives are always on the horizon. Your skills as a creator contribute directly to the platform's vibrant and diverse ecosystem. Imagine the joy of seeing players proudly wearing your custom-designed items in their favorite games. This journey is not just about making digital assets; it's about connecting with a global community and leaving your creative mark. What amazing things will you build next?
Quick Summary of Key Highlights
Creating a Roblox accessory involves several key stages. First, conceptualize your design and gather inspiration. Next, use Blender for 3D modeling, focusing on optimized polygon counts. After modeling, perform UV unwrapping and apply detailed textures using software like Substance Painter. Rig your accessory correctly to the Roblox avatar skeleton for natural movement. Finally, import your creation into Roblox Studio, configure its properties, and thoroughly test it. Always adhere to Roblox's UGC guidelines for successful submission and monetization. Consistent practice and attention to detail are paramount. This structured approach helps you craft high-quality items. Your digital creations will shine within the Roblox universe. Unleash your creativity and contribute to this amazing platform.
- Modeling Software: Utilize Blender for robust 3D modeling and sculpting.
- Texturing Tools: Substance Painter or similar for detailed, appealing designs.
- Roblox Studio: Essential for importing, rigging, and publishing accessories.
- UGC Program: Understand the requirements for becoming a verified accessory creator.
- Optimization Tips: Reduce polygon count and texture resolution for better performance.
- Rigging Basics: Learn to connect your accessory to avatar bones for proper movement.
- Monetization: Explore selling your creations on the Roblox marketplace.
- Community Engagement: Get feedback and build a following for your unique items.


How To Make 2D ACCESSORIES IN ROBLOX YouTube . How To UPLOAD ACCESSORIES In Roblox FULL GUIDE 2026 YouTube . How To Make Accessories In Roblox Playbite How To Make Accessories In Roblox . How To Make Custom Accessories In Roblox Studio At Christopher . How To Make Accessories In Roblox In 2025 YouTube


How To Make Roblox Accessories In Blender UGC YouTube . How To Make Custom Accessories In Roblox Studio YouTube . How To Create And Sell Your Own Roblox Accessories New Guide YouTube . How To Add Accessories In Roblox Studio Lawod How To Add Accessories In Roblox Studio.webp. How To Make Custom Accessories In Roblox Studio At Christopher


How To MAKE HATS HAIR ACCESSORIES WITHOUT ROBLOX STUDIO On ROBLOX 1675222397 . How To Add Accessories In Roblox Studio Complete Guide 2024 YouTube . How To Add Accessories And Gears To Rigs Roblox Studio Tutorial YouTube . Good Roblox Accessories At Terry Rousseau Blog . How To Make Custom Accessories In Roblox Studio At Christopher


How To Add Accessories In Roblox Studio 2025 YouTube . How To Equip Multiple Accessories In Roblox Roblox Accessories Guide . How To Do ACCESSORY ADJUSTMENT On Roblox 2025 Tutorial YouTube . How To Make Roblox Accessories Get Robux YouTube . How To Put On Multiple Accessories On Roblox Equip Roblox Multiple


How YOU Can Make YOUR OWN ROBLOX ACCESSORIES Public UGC YouTube . Build A Zoo Roblox Guide 2026 Complete Beginner Tutorial All Roblox Kaizen Accessories Guide . How To Add Accessories In Roblox Studio Add UGC Items To Roblox . How To Wear Multiple Accessories On Roblox Mobile 2025 YouTube . How To Make Roblox Accessories Get Robux YouTube


How To Make Roblox Accessories In 2025 Get Robux YouTube . How To Add More Than One Accessory In Roblox 2024 YouTube . How To Wear Multiple Face Accessories Roblox 2024 YouTube . How To Adjust Accessories In Roblox 2024 Quick Tutorial YouTube . How To Add People Roblox Easily Your 2026 Guide


How To Wear Multiple Back Accessories In Roblox At Martin Loya Blog . Making Roblox UGC Accessories How To Make ROBUX YouTube . Make Your 3d Ugc Roblox Accessories Helmet Bag Hat Weapon Hair By Create Your 3d Roblox Accessories Cloth Bag Hat Chain Hair And Many More . Tutorials Customuse Blog Upload To Roblox . Roblox RELEASED The Resize Accessory Update YouTube